Trong bài viết này, chúng ta sẽ tìm hiểu cách tích hợp Redis với Spring Boot để cải thiện hiệu suất bằng cách sử dụng Cache-Aside design pattern.
Có thể một số bạn chưa biết Redis là viết tắt của Remote Dictionary Server. Nó là một NoSQL DB trong bộ nhớ, theo mình biết là nhanh nhất đến thời điểm hiện tại, chủ yếu được sử dụng để lưu vào bộ nhớ đệm dữ liệu được sử dụng thường xuyên và ít bị thay đổi. Nó cũng có rất nhiều tính năng khác mà chúng ta sẽ nói trong bài viết này và trong các bài viết khác.
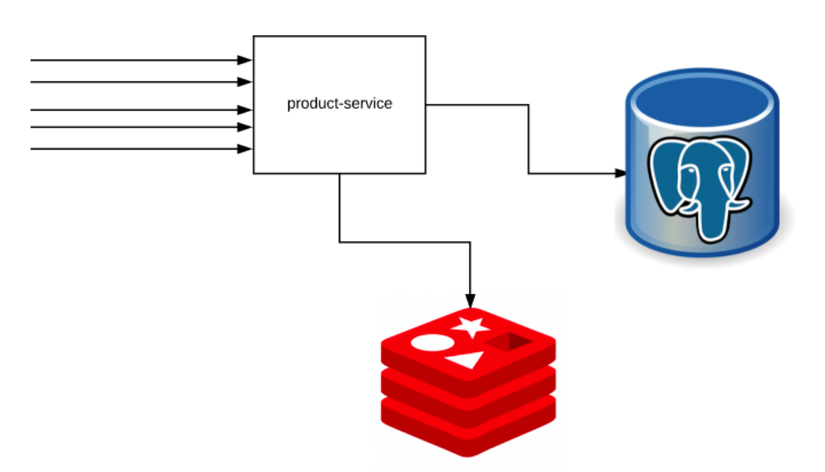
Trong kiến trúc Microservices, chúng ta có một vài dịch vụ và chúng nói chuyện với nhau để hoàn thành một nghiệp vụ nào đó. Trong một số trường hợp, một số microservice có thể nhận được nhiều GET request để lấy về thông tin cụ thể của một tài nguyên. Ví dụ: product-service có thể thường xuyên nhận request từ các service khác để lấy được một số thông tin sản phẩm. Thay vì mỗi lần request như vậy phải lấy thông tin sản phẩm từ DB, các microservice có thể lưu thông tin này vào bộ nhớ cache – để chúng ta có thể tránh việc gọi các lệnh vào DB không cần thiết liên quan đến nhiều phép join bảng. Microservice có thể lưu thông tin này vào bộ nhớ cục bộ của nó.
Hãy xem xét một ứng dụng như sau, product-service chịu trách nhiệm cung cấp thông tin sản phẩm dựa trên mã sản phẩm (product_id). DB chúng ta sử dụng cho product-service là Cơ sở dữ liệu PostgreSQL. Ứng dụng của chúng ta sẽ có 2 API.
Chúng ta sử dụng docker-compose để setup Postgres DB:
version: "3"
services:
  postgres:
    image: postgres
    container_name: postgres
    environment:
      - POSTGRES_USER=admin
      - POSTGRES_PASSWORD=admin
      - POSTGRES_DB=productdb
    volumes:
      - ./db:/var/lib/postgresql/data
  pgadmin:
    image: dpage/pgadmin4
    container_name: pgadmin
    environment:
      - PGADMIN_DEFAULT_EMAIL=admin@gmail.com
      - PGADMIN_DEFAULT_PASSWORD=admin
    ports:
      - 80:80
Tạo bảng product lưu thông tin sản phẩm (mọi người tự thêm dữ liệu vào nhé)
CREATE TABLE product(
   id serial PRIMARY KEY,
   description VARCHAR (500),
   price numeric (10,2) NOT NULL,
   qty_available integer NOT NULL
);
@Entity
public class Product {

    @Id
    @GeneratedValue(strategy = GenerationType.AUTO)
    private long id;

    private String description;
    private double price;
    private long qtyAvailable;

    //getters & setters

}
@Repository
public interface ProductRepository extends JpaRepository<Product, Long> {
}
public class ProductDto {

    private long id;
    private String description;
    private double price;
    private long quantityAvailable;

    // getters & setters

}
public interface ProductService {
    Optional<ProductDto> getProduct(long id);
    void updateProduct(ProductDto productDto);
}
@Service
public class ProductServiceImpl implements ProductService {

    @Autowired
    private ProductRepository productRepository;

    @Override
    public Optional<ProductDto> getProduct(long id) {
        return this.productRepository
                .findById(id)
                .map(this::entityToDto);
    }

    @Override
    public void updateProduct(ProductDto productDto) {
        this.productRepository
                .findById(productDto.getId())
                .map(p -> this.setQuantityAvailable(p, productDto))
                .ifPresent(this.productRepository::save);
    }

    private ProductDto entityToDto(Product product){
        ProductDto dto = new ProductDto();
        dto.setId(product.getId());
        dto.setDescription(product.getDescription());
        dto.setPrice(product.getPrice());
        dto.setQuantityAvailable(product.getQtyAvailable());
        return dto;
    }

    private Product setQuantityAvailable(Product product, ProductDto dto){
        product.setQtyAvailable(dto.getQuantityAvailable());
        return product;
    }
}
@RestController
public class ProductController {

    @Autowired
    private ProductService productService;

    @GetMapping("/product/{id}")
    public ResponseEntity<ProductDto> getProduct(@PathVariable long id){
        return this.productService.getProduct(id)
                .map(ResponseEntity::ok)
                .orElse(ResponseEntity.noContent().build());
    }

    @PatchMapping("/product")
    public void updateProduct(@RequestBody ProductDto dto){
        this.productService.updateProduct(dto);
    }

}
spring:
  datasource:
    url: jdbc:postgresql://localhost:5432/productdb
    username: admin
    password: admin
Chạy application lên và test thử, nếu kết quả tương tự bên dưới là setup thành công.
// http://localhost:8080/product/2

{
   "id":2,
   "description":"Product2",
   "price":1297.23,
   "quantityAvailable":69
}
Đầu tiên chúng ta thêm dependency Spring Data Redis (tìm kiếm trên maven ripository).
Ý tưởng ở đây là khi request tới service, thì sẽ kiểm tra dữ liệu trong Redis DB trước, nếu không tồn tại sẽ đi tiếp đến Postgres DB để lấy dữ liệu.
@EnableCaching vào application@EnableCaching
@SpringBootApplication
public class CacheAsideApplication {
public static void main(String[] args) {
SpringApplication.run(CacheAsideApplication.class, args);
}
}
version: "3"
services:
  postgres:
    image: postgres
    container_name: postgres
    environment:
      - POSTGRES_USER=admin
      - POSTGRES_PASSWORD=admin
      - POSTGRES_DB=productdb
    volumes:
      - ./db:/var/lib/postgresql/data
    ports:
      - 5432:5432
  pgadmin:
    image: dpage/pgadmin4
    container_name: pgadmin
    environment:
      - PGADMIN_DEFAULT_EMAIL=admin@gmail.com
      - PGADMIN_DEFAULT_PASSWORD=admin
    ports:
      - 80:80
  redis:
    container_name: redis
    image: redis
    ports:
      - 6379:6379
  redis-commander:
    container_name: redis-commander
    image: rediscommander/redis-commander:latest
    environment:
      - REDIS_HOSTS=local:redis:6379
    ports:
      - 8081:8081
application.ymlspring:
datasource:
url: jdbc:postgresql://localhost:5432/productdb
username: vinsguru
password: admin
cache:
type: redis
redis:
host: localhost
port: 6379
Bây giờ Spring Boot application của chúng ta đã sẵn sàng để làm việc với Redis. Tuy nhiên, chúng ta sẽ phải cho Spring Boot biết khi nào cần thực hiện và loại thông tin nào chúng ta muốn lưu vào bộ nhớ cache Redis.
Spring Boot đơn giản hóa việc cấu hình với các annotation của nó.
@Cacheable trên bất kỳ phương thức nào để lưu vào bộ nhớ cache giá trị phản hồi mà phương thức trả về.@CacheEvict.Ví dụ: sử dụng @Cacheable và @CacheEvict trong trường hợp update thông tin sản phẩm như sau:
@Cacheable: lưu vào bộ nhớ cache giá trị return của phương thức với key là mã sản phẩm@CacheEvict: chúng ta sẽ xóa bộ nhớ cache bất cứ khi nào cập nhật thông tin cho sản phẩm. Nếu không, dữ liệu sẽ không được đồng bộ. Khi bộ nhớ cache bị xóa, ở request GET lấy thông tin sản phẩm lần tiếp theo với mã sản phẩm sẽ cập nhật bộ nhớ cache với thông tin mới nhất. @Override
@Cacheable("product")
public Optional<ProductDto> getProduct(long id) {
return this.productRepository
.findByDescription("Product"+id)
.map(this::entityToDto);
}
@Override
@CacheEvict(value = "product", key = "#productDto.id")
public void updateProduct(ProductDto productDto) {
this.productRepository
.findById(productDto.getId())
.map(p -> this.setQuantityAvailable(p, productDto))
.ifPresent(this.productRepository::save);
}
Vậy là chúng ta vừa hoàn thành cấu hình Spring Boot Redis. Hầu hết các ứng dụng CRUD thực hiện READ nhiều hơn WRITE. Vì vậy, bộ nhớ cache thông tin được truy cập thường xuyên có thể cải thiện hiệu suất của ứng dụng. Khi chúng ta sử dụng design pattern này, hãy nhớ rule loại bỏ thông tin cũ khỏi bộ nhớ cache.
Hi vọng bài viết hữu ích với mọi người.
You need to login in order to like this post: click here
YOU MIGHT ALSO LIKE

SUBSCRIBE TO OUR NEWSLETTER