AWS Guard Duty
What is Amazon Guard Duty?
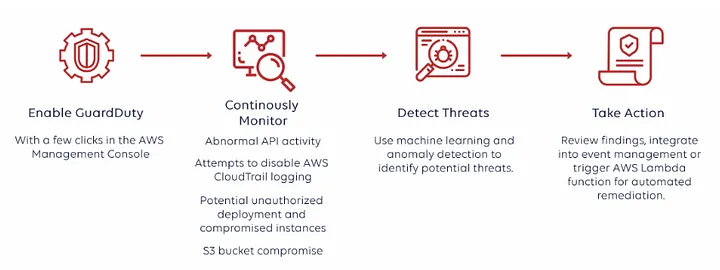
AWS Guard Duty is a threat detection service that will identify any malware activities happening in these services like S3, EBS volume data, EKS, DNS logs, VPC flow logs, and Account levels by using AWS Cloudtrail management and data logs.
It’s essentially a security service that keeps an eye on everything happening in your account at an infrastructure level, alerting you to any undesirable behavior.
What can we achieve by using Guard Duty?
GuardDuty can detect compromised EC2 instances and container workloads serving malware. It also monitors AWS account access behavior for signs of compromise, such as unauthorized infrastructure deployments, like instances deployed in a Region that has never been used, or unusual API calls like a password policy change to reduce password strength.
Basic understanding of Guard Duty :
When we enable guard duty, by default it will create its IAM service level role and permissions.
Guard duty is a regional service. And it should be repeated in all regions(even though we are not using any specific regions) to protect and understand global services like S3 and IAM.
Guard Duty uses ML(Machine Learning) to understand the difference in our environment between abnormal and normal traffic behavior. It takes at least 7 days to do it.
When we need to blacklist or whitelist the IP Addresses in the S3 bucket automatically we can write a lambda script and create an event bridge and store those IP Addresses in the S3 bucket. And we can paste the URL or ARN into the trusted and malicious IP list.
Steps To Enable GuardDuty
Step 1: Enable Amazon GuardDuty
Step 2: Generate sample findings and explore basic operations
Step 3: Configure GuardDuty findings to export to an S3 bucket
Step 4: Set up GuardDuty finding alerts through SNS and Event Rule.
Step 1:Enable Guard Duty:
First login to the console with was AWS account and follow the below steps,
As I mentioned earlier, the service role permissions will be created automatically while enabling the Guard duty.
Step 2: Generate sample findings and explore basic operations
Choose “Setting” from the panel, and click on the option “Generate Sample Findings”. It helps you to understand the findings. Refer to the below screenshot for reference,
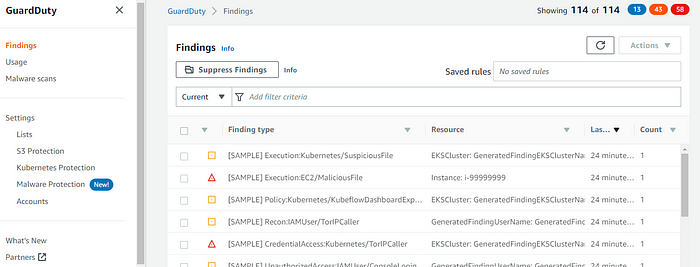
From the above screenshot, we can find the risk severity in different colors with all numbers which indicate the severity in different levels of risks and it shows all S3, EC2, and EBS findings in the dashboard. Click on the findings for a better understanding. To understand the individual finding better like (For EX: Recon:IAMUser/TorIPCaller). Please refer to the link to know the details.
https://docs.aws.amazon.com/guardduty/latest/ug/gd-findings-initiate-malware-protection-scan.html
Step 3: Configure GuardDuty findings to export to an S3 bucket
When GuardDuty does any findings it stores the data only for 90 days to access the data after 90 days we can store the data in S3 by creating a bucket or using an existing bucket. With a New or Existing KMS key for these buckets Click on settings. Click on Configure now. To configure the bucket and KMS to store it.
https://docs.aws.amazon.com/guardduty/latest/ug/gd-findings-initiate-malware-protection-scan.html
NOTE: This process is needed if we need to store the data for more than 90 days. New findings are exported within 5 minutes.
Step 4: Set up GuardDuty finding alerts through SNS and Event Rule.
Create an SNS topic and Subscribe to the topic to receive notifications from Guard Duty.
MALWARE PROTECTION:
We have the other option called malware detection for EBS volume it scans all EBS Volume by replicating the EBS volume present in the region once it starts scanning if it finds any infected EBS Volume it retains it in the console else it deletes all the EBS volume it scanned.
NOTE: To save EBS Volume in the GuardDuty it recurs cost for the EBS volume.
Configure Malware Protection:
On the panel, malware protection. Enable the GuardDuty-initiated malware scan. Go to General Settings. Click on the button it will start scanning for all the EBS volumes available in the region we enabled.
On the same tab, we can find the option Inclusion/Exclusion Tags. This service is helpful to scan the ec2 instances if we want to include or exclude the group or particular EC2 instances. Add the tags for EC2 instances. Add the same tags for inclusion or exclusion according to our choice.
At any time, we can either choose Inclusion tags or Exclusion tags but not both. If we want to switch between the tags, choose that tag from the dropdown menu
Note: It may take up to 5 minutes for GuardDuty to detect a new tag.
On-Demand Scan:
We can Start On-Demand scans in 2 ways. One way is Malware Scans and the other one is Malware Protection. We have to paste the instance ARN to scan and get started. And click on Confirm. Depending on the volume size it will take time to get scanned done.
Eg : arn:aws:ec2:us-east-1:555555555555:instance/i-1234567890abcdef0
Resource: https://docs.aws.amazon.com/guardduty/latest/ug/guardduty_settingup.html
You need to login in order to like this post: click here
YOU MIGHT ALSO LIKE

SUBSCRIBE TO OUR NEWSLETTER
