
Building UI in Flutter is pretty simple with all the widgets that the framework provides, part of which I covered in my last article. But we can’t just have a beautiful application that does nothing functional. We will be required to move around the application or send data back and forth between screens. In Flutter, navigation from one screen to another is possible because of Navigators, a simple widget that maintains a stack of Routes, or in simpler terms, a history of visited screens/pages.
You will find plenty of articles that tell you how to push to a new screen or pop from the current screen, but this article is a little more than that. This would primarily focus on most of the Navigator methods and describe a use-case for each method.
You mentioned about Routes somewhere, what was that?
Routes is an abstraction for a screen or a page of an app. For example, '/home' will take you to HomeScreen or '/login' will take you to LoginScreen. '/' will be your initial route. This might sound so much similar to Routing in REST API development. So '/' might act like a root.
This is how you would declare your routes in your Flutter application.
new MaterialApp(
  home: new Screen1(),
  routes: <String, WidgetBuilder> {
    '/screen1': (BuildContext context) => new Screen1(),
    '/screen2' : (BuildContext context) => new Screen2(),
    '/screen3' : (BuildContext context) => new Screen3(),
    '/screen4' : (BuildContext context) => new Screen4()
  },
)
Screen1(), Screen2(), etc are the names of the classes for each screen.
If you have any knowledge in Data Structures, then you know about Stacks. If you have even basic knowledge of stacks, then you know about push and pop.
If you don’t, pushing is adding element to the top of a stack of elements and popping is removing the top element from the same stack.
So in case of Flutter, when we navigate to another screen, we use the push methods and Navigator widget adds the new screen onto the top of the stack. Naturally, the pop methods would remove that screen from the stack.
So lets move to the codebase of our sample project and let’s see how we can move from Screen 1 to Screen 2. You can experiment with the methods by running the sample app.
new RaisedButton(
   onPressed:(){
   Navigator.of(context).pushNamed('/screen2');
},
   child: new Text("Push to Screen 2"),
),
That was short.
That was indeed. With the help of pushNamed methods, we can navigate to any screen whose route is defined in main.dart. We call them namedRoute for reference. The use-case of this method is pretty straightforward. To simply navigate.

Now when we want to get rid of the last visited screen, which is Screen2 in this case, we would need to pop Routes from the Navigator’s stack using the pop methods.
Navigator.of(context).pop();Remember, this line of code goes inside your onPressed method.

When using Scaffold, it usually isn’t necessary to explicitly pop the route, because the Scaffold automatically adds a ‘back’ button to its AppBar, which would call Navigator.pop() on pressed. Even in Android, pressing the device back button would do the same. But nevertheless, you might need this method for other usecases such as popping an AlertDialog when user clicks on Cancel button.
Why pop instead of pushing back to the previous screen?
Imagine you have a Hotel Booking app that lists the hotels in your desired location. Clicking on any list item will take you to a screen that has more details about the hotel. You choose one, and you hate the hotel and want to go back to the list. If you push back to the HotelListScreen, you will be keeping your DetailsScreen onto your stack too. So pressing on the back button would take you back to the DetailsScreen. So confusing!
You should try it out instead. Run the sample app, notice the appBar on your Screen1 , it doesn’t have any back button, because it is the initial Route (or home screen), now press Push to Screen 2 and instead of back button, press the Push to Screen1 instead of Pop and now notice the appBar on Screen1. Pressing on the newly appeared back button will take you back to Screen2 and you don’t want that in such cases.

Now what if you are on the initial Route and somebody mistakenly tried to pop this screen. Popping the only screen on the stack would close your app, because then it has no route to display. You definitely don’t want your user to have such an unexpected user experience. That’s where maybePop() comes into picture. So it’s like, pop only if you can. Try it out, click on the maybePop Button on Screen1 and it will do nothing. Because there is nothing to pop. Now try the same on Screen3 and it will pop the screen. Because it can.
It’s amazing that we can do this, but how can I know if this is the initial route? It would be nice if I could display some alert to user in such cases.
Great question, just call this canPop() method and it would return true if this route can be popped and false if it’s not possible.
Try both these methods canPop and maybePop on Screen1 and Screen3 and see the difference. The print values for canPop will display in your console tab of your IDE.
Let’s come back to more push methods. Now we are getting deeper. We will now talk about replacing a route with a new route. We have two methods that can do this — pushReplacementNamed and popAndPushNamed.
Navigator.of(context).pushReplacementNamed('/screen4');
                       //and
Navigator.popAndPushNamed(context, '/screen4');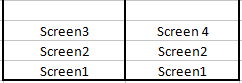
Try to experiment with both in the sample app’s Screen3. And notice the exit and enter animation in each case. pushReplacementNamed will execute the enter animation and popAndPushNamed will execute the exit animation. We can use this for the following possible use-cases.
When the user has logged in successfully, and are now on the DashboardScreen perhaps, then you don’t want the user to go back to LoginScreen in any case. So login route should be completely replaced by the dashboard route. Another example would be going to HomeScreen from SplashScreen. It should only display once and the user should not be able to go back to it from HomeScreen again. In such cases, since we are going to a completely new screen, we may want to use this method for its enter animation property.
Suppose, you are building a Shopping app that displays a list of the products in its ProductsListScreen and user can apply filters in the FiltersScreen. When the user clicks on the Apply Changes button, the FiltersScreen should pop and push back to the ProductsListScreen with the new filter values. Here the exit animation property of popAndPushNamed would look more appropriate.
We are almost at the end of the article. Well, almost.
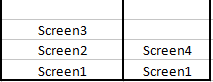
In this section, we will cover the following three methods pushNamedAndRemoveUntil and popUntil.
So basically you building a Facebook/Instagram like application, where user logs in, scrolls through their feed, stalks through different profiles, and when done, wants to log out of the app. After logging out, you can’t just simply push a HomeScreen (or any screen that needs to be displayed after logging out) in such cases. You want to remove all routes in the stack so that user cannot go back to the previous routes after they have logged out.
Navigator.of(context).pushNamedAndRemoveUntil('/screen4', (Route<dynamic> route) => false);Here (Route<dynamic> route) => false will make sure that all routes before the pushed route be removed.

Now instead of removing all routes before the pushed routes, we can only remove certain number of routes. Let’s take another Shopping app example! Or basically any app that requires payment transaction.
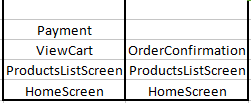
So in these apps, once a user has completed the payment transaction, all the transaction or cart related screens should be removed from the stack, and the user should be taken to the PaymentConfirmationScreen. Clicking on the back button should take them back to the ProductsListScreen or HomeScreen only.
Navigator.of(context).pushNamedAndRemoveUntil('/screen4', ModalRoute.withName('/screen1'));So according to the code snippet, we push Screen4 and remove all routes until Screen1, so our stack would look like this.
Imagine you are building a Google Forms like application or an app that lets you fill and organize Google forms. Now some user might have to fill a long 3-part form, which might be displayed in 3 sequential screens in a mobile application. Now on the 3rd part of the form, user decides to cancel filling the form. User clicks on Cancel and all the previous form related screens should be popped and user should be taken back to the HomeScreen or DashboardScreen thereby losing all the form related data (which is what we want in such cases). We won’t be pushing anything new here, just going back to a previous route.
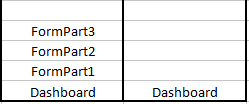
Navigator.popUntil(context, ModalRoute.withName('/screen2'));In most of the examples above, I am just pushing a new route without sending any data but such a scenario is highly unlikely in a real application. To send data, we would be using Navigator to push a new MaterialPageRoute onto the stack with our data, (here it’s userName)
String userName = "John Doe";
Navigator.push(
    context,
    new MaterialPageRoute(
        builder: (BuildContext context) =>
        new Screen5(userName)));
To retrieve the values in Screen5 , we would just add a parameterized constructor in Screen5 like this:
class Screen5 extends StatelessWidget {

  final String userName;
  Screen5(this.userName);
  @override
  Widget build(BuildContext context) {
  print(userName)
  ...
  }
}
This means that you can not only use MaterialPageRoute for push method, but also for pushReplacement, pushAndPopUntil, etc. Basically drop the named keyword from the above methods we described, and the first parameter will now take a MaterialPageRoute instead of a String of namedRoute.
You might also want to return data from a new screen. Like suppose you are building a Alarm app, and to set a new tone for your alarm, you would show a Dialog with a list of audio tone options. Obviously you would need the selected item data once that Dialog box has been popped. It can be achieved like this:
new RaisedButton(onPressed: ()async{
  String value = await Navigator.push(context, new MaterialPageRoute<String>(
      builder: (BuildContext context) {
        return new Center(
          child: new GestureDetector(
              child: new Text('OK'),
              onTap: () { Navigator.pop(context, "Audio1"); }
          ),
        );
      }
  )
  );
  print(value);

},
  child: new Text("Return"),)
Try it out in Screen4 and check the console for the print values.
Also to note : When a route is used to return a value, the route’s type parameter should match the type of pop’s result. Here we need a String data back so we’ve used MaterialPageRoute<String>. It’s alright to not specify the type too.
It was indeed, and I could have just described the methods and their implementation simply, but since there are so many Navigator methods, I wanted to explain them using scenarios taken from real world applications. I hope this helped some of you broaden your Navigator horizon.
Following: Medium.com
You need to login in order to like this post: click here
YOU MIGHT ALSO LIKE

SUBSCRIBE TO OUR NEWSLETTER
