
Before we create a SOAPUI Test case, let us understand basics about the SOAP Protocol. This will help you use SOAP UI to test SOAP requests and response effectively.
SOAP stands for Simple Object Access Protocol. Below are the properties of a SOAP Protocol.
In this SoapUI Test Suite tutorial, you will learn:
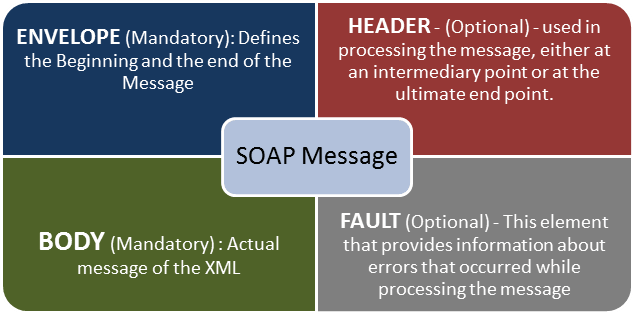
A SOAP message is an ordinary XML document containing the following elements. Message can be either a request message or a response message.
After setting up the workspace which we had performed in the last tutorial, we have to create SoapUI project structure, test suites, test cases in order to test a given web service. Let us understand a SoapUI Project example to create a new SOAP project.
Step 1) Now, depending upon the project, we need to import SOAP/REST protocol. We will create a new SOAP Project.

Step 2) We will make use following SOAP request http://www.dneonline.com/calculator.asmx?wsdl

Note:
Step 3) Upon creating the SOAP project with the above-said WSDL, we will be able to see that there are two operations that will be imported into the project.

Step 4)
Expand the first request and right-click on the ‘Add.’ Then click on ‘New Request’.

Then Click on ‘OK’. It will display the SOAP request in the XML format


You may wonder why create Test Cases? When you can directly test Webservice here…
Well, you can send a request for one operation. What about others? How many combinations of inputs for Additions can you do using this operation? You have to edit the request for each and every combination.
For example: If you want to add from 4 and 4 instead of 5 and 5… You need to edit the operation again. So, one has to create a test suite/cases to have all possible scenarios tested without having to directly edit the operation itself.
Below are the steps to create Test Suite in SoapUI:
Step 1) Right-click on the root of the project
Within the project, testers can create a test suite by performing a right-click on the root of the project.

Step 2) Enter the Test suite details
We need to enter the name of the test suite and press OK.

Step 3) Verify the created Test suite
The created test suite is displayed the navigator pane as shown below.

Step 4) Open the Test suite
The test Suite window opens in the Right Pane. As we have just created there are NO SoapUI test cases. Hence all options are disabled.

Here is a step by step process for creating a test case in SoapUI:
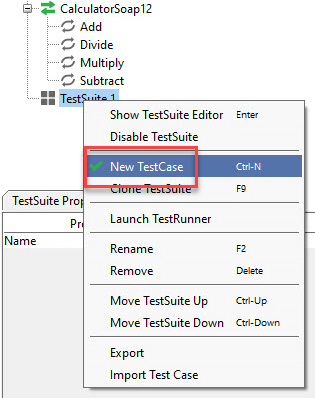
Step 1) Within a test suite, we can create multiple tests by performing right click on the ‘test suite’ and choosing ‘New TestCase’.
Step 2) Specify the name of the Test Case and click ‘OK’.

Step 3) The created test case has zero steps as shown below.

Note: We can see that the test case is added with zero test steps for all kinds of tests available. Upon adding the test steps, the numbers in the bracket would change automatically.
The functional test step should go into ‘Test Steps’ while a performance test step should go into ‘Load Test’ and a security test step should go into ‘security Tests’.
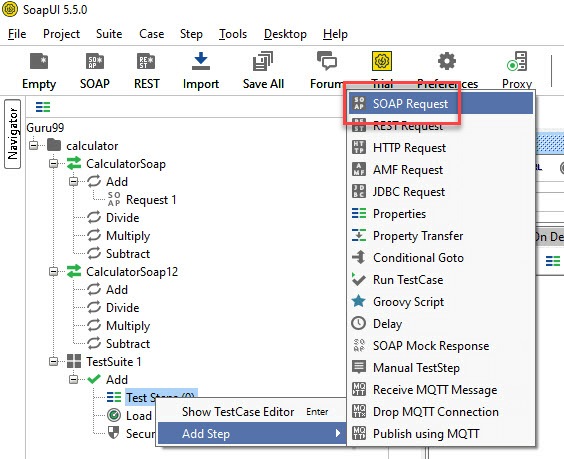
Step 4) We can insert a variety of test steps by performing a right-click on test steps and selecting an appropriate test step as shown below. So, if you were to test a REST Webservice, you would select the REST Test Request.

Now let us add a test step to validate the imported SOAP testing request:
Step 1) Add a new step ‘SOAP Request’ as shown below.
Step 2) Enter the step name and click OK.

Step 3) Upon clicking ‘OK’, a dialog pops up to select the operation to invoke. All the operations are listed, and user can select the operation that they would like to invoke.


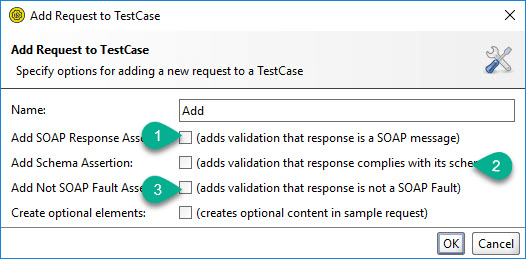
Step 4) While adding a test case, we can add standard assertions. Assertions also called as checkpoints/validation points which we will be dealing in detail in the next tutorial.
We can add following checkpoints/assertions while creating test case. Let us create a test case with the option which means creating test step WITHOUT any of the below validation pointshttps://2ada74ef26b05d6faec41a958b175eef.safeframe.googlesyndication.com/safeframe/1-0-38/html/container.html
Step 5) Upon creating the test case, the request XML is shown below. The structure of the XML is explained within the below snapshot.

Step 6) The test step count is now incremented to one as we have just added one test step. Similarly, upon adding load and security tests step, the corresponding number would be automatically incremented based on the number of steps added.

Step 1) We would like to add two Integer Number.
Next,

Step 2) Upon submitting a request the web service request is processed by the webserver and sends back a response as shown below.
By reading the response, we are able to conclude 5 plus 5 is 10.

As explained at the beginning of this SoapUI testing tutorial, the SOAP messages are transported via HTTP protocol. Let us take a look at the RAW messages. This will help us learn how the SOAP request and response were transported by HTTP.
Step 1) Click ‘RAW’ Tab in both SOAP-UI request Window.

Step 2) Now click ‘RAW’ Tab in SOAP-UI Response Window to understand how the response is sent via HTTP.

A Quick snapshot of the Http Response codes for easy understanding and debugging. The below table will help you to trouble shoot based on the HTTP code received from the webserver.
| Http Code | Description |
|---|---|
| 1xx: | Informational – This means a request received and continuing process. |
| 2xx: | Success – The action was successfully received, understood, and accepted. |
| 3xx: | Redirection – This means further action must be taken in order to complete the request. |
| 4xx: | Client Error – This means the request contains bad syntax or cannot be fulfilled |
| 5xx: | Server Error – The server failed to fulfil an apparently valid request |
Step 3) Let us understand the other information that are displayed in the test case window.

LOGS PANE:
Logs pane has complete information regarding the transaction between the client and the server. Users will be able to see the tabs of the Log pane as shown below. We will discuss the most commonly used log panes when working with SOAP-UI.

SoapUI Log – Displays the response information from the webserver. The same information is stored in soapui.log file of the SOAP-UI installed folder under ‘bin’ directory.

Http Log – Displays all the HTTP packet transfer. All the information in ‘RAW’ is shown in HTTP log.

Error Log – Error log displays all the errors that we have encountered during the entire project session. The same information is available in ‘soapui-errors.log’ present in the ‘bin’ directory of the SOAP UI installed location.
Memory Log – This tab monitors the memory consumption and displays it in the form of the chart as shown below. It is really helpful when there is a memory intensive operation is performed.
You need to login in order to like this post: click here
YOU MIGHT ALSO LIKE

SUBSCRIBE TO OUR NEWSLETTER