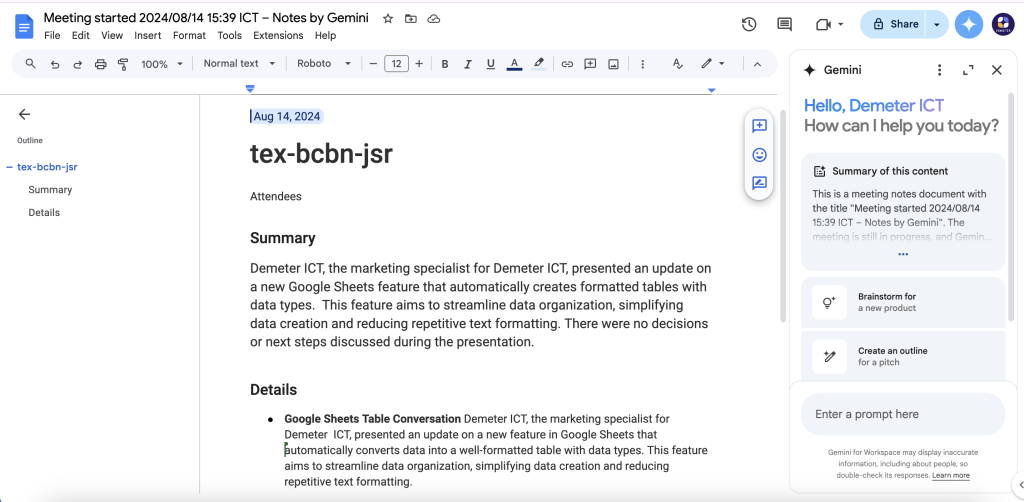
Unity’s interface consists of multiple tabbed windows that can be grouped, docked, and rearranged to suit your needs. The way these interface elements are configured are called Layouts. Our goal is to modify our interface so that the Scene view is the largest window in the Editor, then save our changes into a new Layout so it can be referred to later (Figure 01). Please note that this lesson serves as guidance for how to configure your Layout, but your Layout might differ slightly from ours based on your monitor configuration and screen resolution. Also, your Unity interface may be a lighter color gray than ours depending on what version of Unity you are using.

We can adjust the placement of our windows in a series of short steps. Docking — the process of stacking windows — allows us to switch between windows by clicking their tabs. It’s convenient for accessing multiple windows while making the most efficient use of screen space. Let’s try it. 1. To begin, you need to open the “Unit1_StarterFiles” that you started in Unit 1. Once you’ve opened the project you need to open the Scene we named “Unit 1”. 2. Go to Window > Layouts > select Default.3. Left-click and drag the Project window tab underneath the Hierarchy tab in the upper-left corner of the interface.4. Unity will visualize how this window will appear placed next to the Hierarchy window. We don’t want to have two windows side-by-side. Instead, position the Project window so that its tab is underneath the Hierarchy tab. Release the left mouse button to dock the Project window in place.5. In the Project window, click the Context button (with the three vertical dots) in the upper-right corner. Then change the window setting from Two Column Layout to One Column Layout (Figure 02).

Now that our windows are in the right place, we can adjust their size.6. Left-click and drag the edge of the docked Hierarchy and Project windows as far to the left as possible.7. Do the same for the Inspector window located on the right side of the screen, but this time drag it as far to the right as possible. 8. Last, click and drag the edge of the Console window, then shrink it down as much as possible.9. Once the layout is to your liking, navigate to Window > Layouts > Save Layout to save your Layout. When prompted, give your Layout a name (such as “Previs”) and click Save (Figure 03).

Now, whenever we want to use this interface Layout again, we can load it by navigating to the upper-right corner (next to the Layers drop-down) and selecting the Layout we just created.
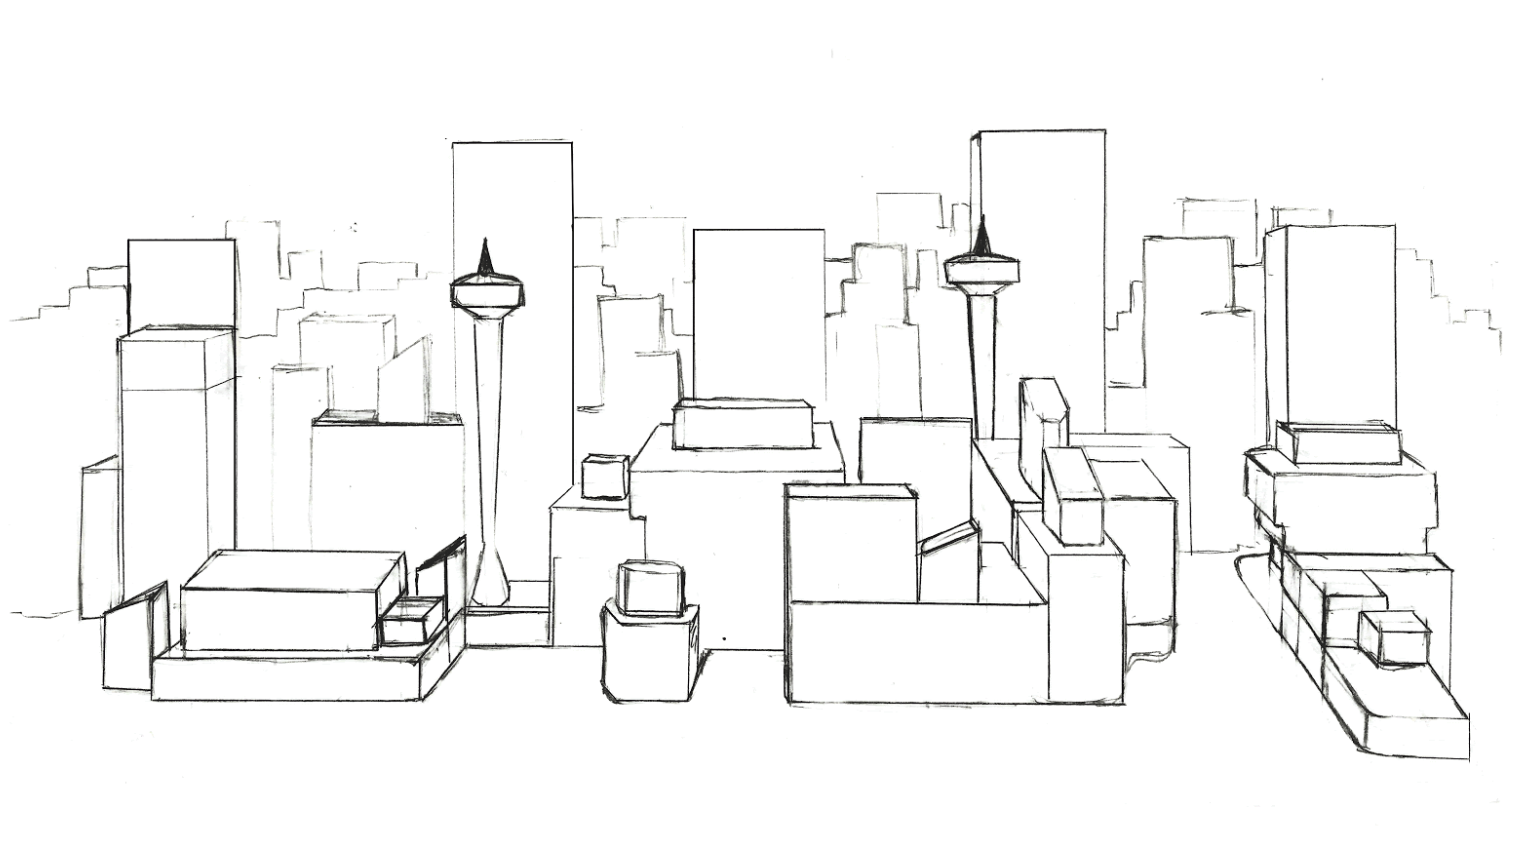
Pre-vis is the first stage in translating a two-dimensional reference to 3D. Adding a new dimension to a flat image can be daunting. To ease into this process, let’s try to roughly approximate the sketch of a cityscape using Unity’s built-in set of primitives.We can divide the sketch into four discrete chunks: the ground plane, the buildings in the far background, the large highrises in the midground, and the more unique, defined buildings in the foreground (Figure 01).

Let’s begin by blocking out the ground plane and the buildings in the background. They’re the largest elements of the sketch and will serve as anchors for the relative placement of the smaller buildings. When provided with a two-dimensional reference, it’s best to start blocking out larger shapes then work toward smaller, more detailed objects. Let’s start with the basics. 1. In the Menu Bar in the upper-left corner, navigate to GameObject > 3D Object > Plane. A new Plane GameObject will be added to the Hierarchy and placed in your Scene (Figure 02). 2. In the Inspector, set the Transform Scale to X:20, Y: 1, Z:20.

GameObjects are the fundamental objects in Unity that represent characters, props, and scenery.3. You may notice that the Plane GameObject has a brown tint. In the Hierarchy, select the Directional Light. In the Inspector, in the Light component, select the Color Picker and change the color to white (Figure 03).

4. With the Directional Light still selected, change the Rotation to X:60, Y:90, Z:90 in the Inspector Transform component. We will discuss the Directional Light in more detail later in this unit.By default, all GameObjects (such as Cubes) automatically have a Transform component. The Transform dictates where the GameObject is located and how it’s rotated and scaled. 5. Download CityBackground.zip here and unzip the folder. 6. Go to the Project window in Unity and right click on Assets > Import Package > Custom Package. Select CityBackground.assetpackage and select Import. 7. From the Project window, navigate to Assets > Prefabs and drag the CityBackground Prefab from the Project window into the Scene view. 8. Select CityBackground in the Hierarchy and set its Position in the Inspector to X:45, Y:25, Z:0. 9. Use the Move, Orbit, and Zoom tools to make your Scene view similar to ours (Figure 04). Read this quick guide to Moving, orbiting and zooming in the Scene view if you have no prior experience with Unity or if you need a refresher.

You need to login in order to like this post: click here
YOU MIGHT ALSO LIKE

SUBSCRIBE TO OUR NEWSLETTER