レッスン2.3-セットへのProBuilderシェイプの追加
概要このレッスンでは、ProBuilderを使用してより複雑な形状を作成する方法を学習します。プリミティブは都市景観を構築するための良いスタートとして役立ちますが、ProBuilderを使用すると、エッジやベベルにさらに洗練を加えたり、曲線などのより有機的な建築形状を追加したりできます。
3ProBuilderは、ジオメトリを作成し、面、エッジ、および頂点を変更できるUnity内の世界を構築するツールです。これにより、デジタルコンテンツ作成(DCC)ツールの機能と柔軟性がUnityにさらに統合されます。3Dモデリングツールの使用経験がある方は、このレッスンの多くのことをよく知っているはずです。モデリングに慣れていない場合は、このレッスンを時間をかけて行ってください。あなたは貴重なスキルを学ぶでしょう。注:当面の間、ProBuilderは以前のProBuilderインストールからの既存の設定を自動的に使用します。以前にProBuilderをインストールしたことがある場合、設定は次の手順とは異なる場合があります。パッケージはいくつかの手順でインストールできます。1.に移動ウィンドウ>パッケージマネージャ。2.左上のドロップダウンメニューに移動し、[すべてのパッケージ]を選択します。3.検索バーでProBuilderを検索し、右下隅にある[インストール]ボタンをクリックしてパッケージをインストールします(図01 )。

4. ProBuilderがインストールされたら、[ツール] > [ ProBuilder] > [ ProBuilderウィンドウ]に移動して開きます(図02 )。

デフォルトでは、これによりフローティングウィンドウが開きます。プロジェクトウィンドウと階層ウィンドウの右側にドッキングしてから、レッスン2.1で作成したレイアウトを再保存します(図03 )。

5. ProBuilderは、デフォルトでテキストモードで開きます。右上隅にある[コンテキスト]ボタンをクリックして、アイコンモードに変更します(図04 )。

Probuilderには多くのツールがあります(図05 )—それらに圧倒されないようにしてください!ここでは、それらのいくつかを段階的に説明します。

このアイコンで表されるProBuilderizeツールを使用してプリミティブの変更を開始できます(図06 )。ProBuilderizeツールは、UnityのオブジェクトをProBuilderで編集可能なオブジェクトに変換します。3Dオブジェクトを1つも選択していない場合、アイコンは灰色で表示されます。

まず、前のレッスンで作成したすべてのプリミティブをProBuilder化してみましょう。 6. Shift +左クリックして、シーンまたは階層で作成した各プリミティブを一度に選択し、ProBuilderizeツールを選択してProBuilderシェイプに変換します。7.作業を保存します。[ファイル] > [保存]に移動します。
ステップを完了としてマークします
0Now that our primitives have been ProBuilderized, we can modify them in interesting ways. Notice that when you installed Probuilder, a new tool menu appeared at the top of the Scene view. The tool menu displays Probuilder’s various object editing modes (Figure 07).

Probuilder has four editing modes:Object: Manipulate the object as a whole, much like how we manipulated the primitives in the previous stepsVertex: Push and pull the vertices of an objectEdge: Select and move only the edge of an objectFace: Select and move only the face of an object Let’s begin by modifying the edges of one of our SmallForegroundBld Cubes to create a sloped roof. 1. Locate one of the SmallForegroundBld Cubes and select it (Figure 08).
Select ProBuilder’s Edge editing mode (Figure 09).
3. In Edge editing mode (third from left), select the front top edge of the Cube. It will highlight yellow (Figure 10).
4. With the Move tool selected, use the green “y” arrow to translate the yellow edge downwards (Figure 11).
When you’re done, you can click another object to edit the edges or not. Just remember you are still in the Edge editing mode, so you’ll only be able to select edges until you switch back to Object editing mode.
Mark step as completed
0You can create rounded corners via a series of bevels. A bevel simply cuts an edge at an angle. Multiple bevels in succession can create more rounded surfaces (Figure 12).
1. Locate one of the MediumForegroundBld2 Cubes and select it (Figure 13).
2. Again, in Edge editing mode, select the vertical corner edge of the building. It will highlight yellow (Figure 14).
3. Alt + left-Click the Bevel tool to access its settings. Set the Distance to 0.1 (Figure 15).
4. Click the Bevel tool directly (without the Alt) once more and your Cube’s edge will bevel at 0.1 (Figure 16).
Notice how the Bevel created a new face, with the new edges highlighted in yellow. 5. Select the left-most vertical edge of the new bevel (Figure 17).
6. Now click the Bevel tool once more and your Cube’s edge will bevel at 0.1 (Figure 18).
7. Select the right-most vertical edge of the new bevel (Figure 19).
8. Click the Bevel tool once more. Your Cube’s edge will bevel at 0.1 (Figure 20).
9. If you choose, select the edges of the bevel as needed and carefully adjust their positioning with the Move tool. The bevel edges may need slight adjustment based on the size of your object. Congratulations! You now have the power to slope and bevel edges! Try out your new skills on the other foreground buildings (Figure 21).
Mark step as completed
1Cubes will take us far, but sometimes we want to quickly block in other basic shapes. ProBuilder’s New Shape tool helps with that (Figure 22).
The New Shape tool has a variety of options including Prism, Stair, Cylinder, Door, Pipe, Cone, Arch, and Sphere. We are going to use the tool to add a door and stairs to our Scene. 1. Alt + left-click the New Shape tool to access its settings. In the drop-down menu, select Door. A door will appear in the Scene. Make sure you’re in Object Mode, not Edge Mode and position the door so it’s at street level and against a building. Be sure to press Build at the bottom of the New Shape settings window to finalize your object. It will turn from white to gray (Figure 23).
2. Alt + left-click the New Shape tool to again to access its settings. In the drop-down menu, select Stair. A set of stairs will appear in the Scene. You can adjust the stairs in the settings menu. Position the stairs somewhere in the Scene. Be sure to press Build at the bottom of the New Shape settings window to finalize your object. It will turn from white to gray (Figure 24). .
Mark step as completed
0You’ve learned to modify primitives and add new Probuilder objects; now let’s try a little more modeling on a new object using the Extrude Faces tool (Figure 25).
This tool won’t appear in the Icon Mode tool menu until you are in Face Selection editing mode. If this is your first time modeling a 3D object, follow the next several steps closely, as there are many new concepts introduced here. In these steps, we are going to model a rough space needle (Figure 26).
If you are experienced with modeling, you can skip steps 1-14 and use the Extrude Faces tool, along with the Move and Scale tools, to model something more like this (Figure 27).
Let’s get started. 1. Before we use the Extrude Faces tool, we need to use the New Shape tool to create a new Cube. Scale the new Cube to X:5, Y:5, Z:5 and Build it (Figure 28).
2. Move your Cube to the ground plane and away from other objects to make it easier to work with. 3. In ProBuilder’s Face Selection editing mode, select the top face of the Cube (Figure 29).
Now we are going to extrude the face of this object with the Extrude Faces tool. We can do this by pressing the Extrude Faces button, or we can use the shortcut hotkeys Ctrl/Cmd + E. In the following instructions, we’ll use the shortcut. Also, we’ll want to leave the Extrude Faces settings set to default (Figure 30).
4. Press Ctrl/Cmd + E. The face will extrude up as so (Figure 31).
5. Using the Move tool, make your cube as tall as the highrises in the Scene (Figure 32).
6. Using the Scale tool, uniformly scale the face of the Cube inwards using the white box in the center of the tool (Figure 33).
7. Press Ctrl/Cmd + E. The face will extrude as so (Figure 34).
8. Using the Scale tool, uniformly scale the face outward (Figure 35).
9. Press Ctrl/Cmd + E. The face will extrude as so (Figure 36).
10. Using the Move tool, extend the height of the new platform (Figure 37).
11. Press Ctrl/Cmd + E. The face will extrude as so (Figure 38).
12. Using the Scale tool, uniformly scale the face inward about 90%. (Figure 39)
13. Press Ctrl/Cmd + E. The face will extrude as so (Figure 40).
14. Using the Scale tool, uniformly scale the face inward 95%. Use the Move tool to extend the face upward to make a point at the top of the building (Figure 41).
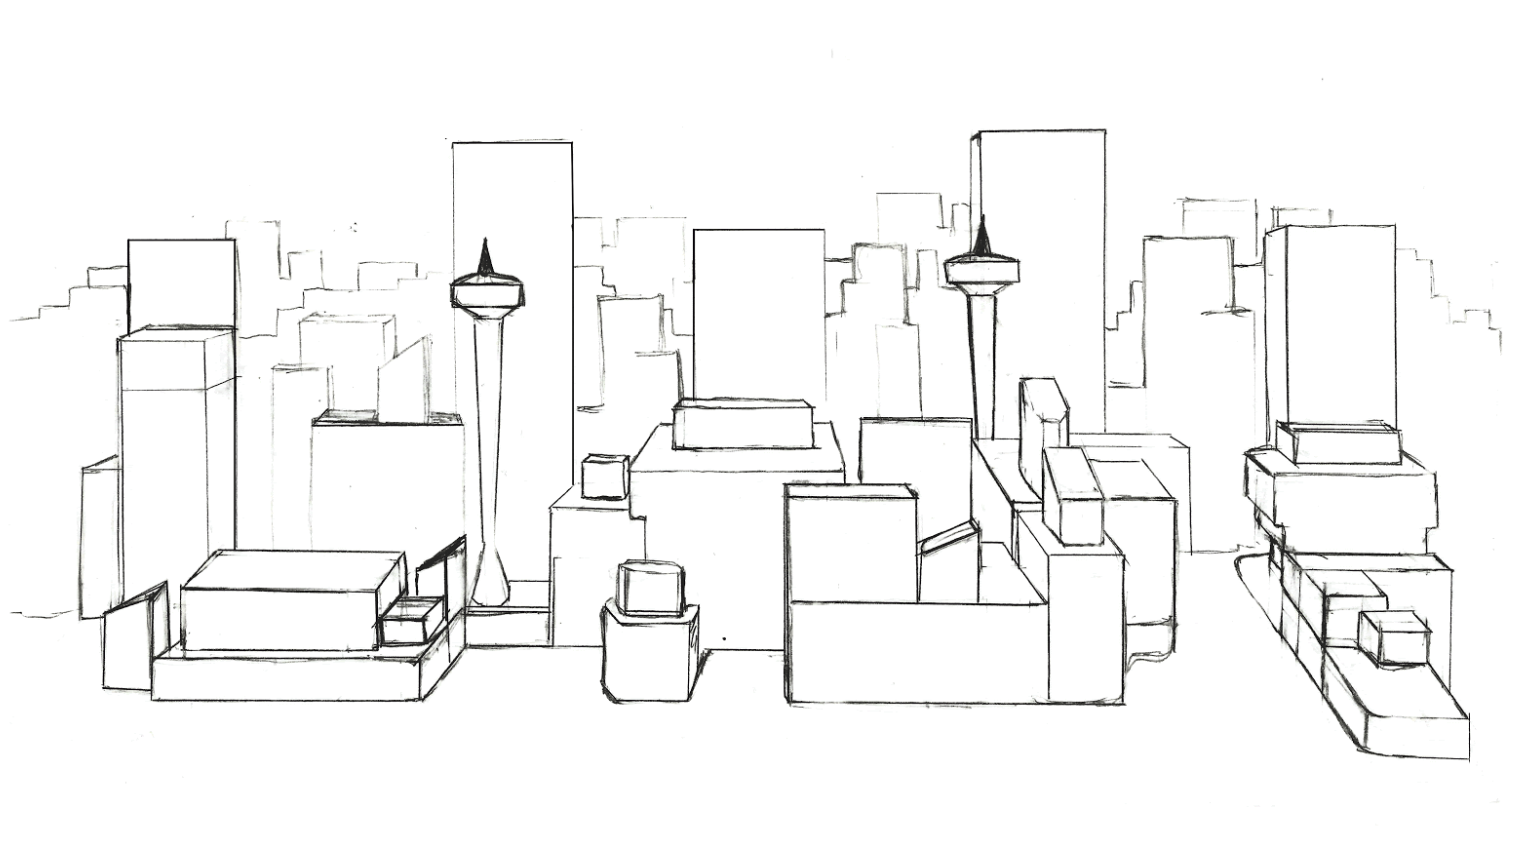
Congratulations! You’ve modelled a space needle, albeit roughly, but you’ve gained the fundamental skills you need to create more refined objects with a little practice and patience. 15. When the shape is complete, name it SpaceNeedle in the Inspector.16. Duplicate the shape and place both in the Scene relative to the sketch (Figure 42).
Our skyline should now look something like this (Figure 43):
Mark step as completed
3Prefabs are a unique type of GameObject that can be shared and referenced between Scenes, or even other projects, without having to be reconfigured. A major benefit of Prefabs is that any changes made or applied to the original Prefab will extend to all other instances. This makes fixing errors and creating alterations fast and efficient.Prefabs are created automatically when an object is dragged from the Hierarchy into the Project window. Let’s create a Prefab of the SpaceNeedle object we just created:1. First, select the SpaceNeedle shape on the left side of the city.2. Next, drag and drop it into the Prefabs folder in the Project window.3. Delete the SpaceNeedle shape on the right side of the city and replace it with the Prefab we just created by dragging the SpaceNeedle prefab from the Project window into the Scene view.Prefabs are differentiated in the Project window via the *.prefab file extension and are labeled with a blue font in the Hierarchy (Figure 44).
We can open the Prefab Editor by double-clicking the Prefab in the Project window. Here we can see the Prefab we just created in an isolated view and also edit its individual components (Figure 45).
We can enter ProBuilder’s editing modes to make additional changes to this Prefab. The changes would be reflected in all instances of the Prefab in the Scene. Let’s make a minor adjustment to the SpaceNeedle object to demonstrate this.
5. Return to the Scene view by pressing the SpaceNeedle back button that’s under the Hierarchy (Figure 46).
Now, when we return to the Scene view, we will see that the changes have been applied to both instances of the SpaceNeedle Prefab (Figure 47).
スペースニードルの背の高いバージョンに戻したい場合は、Ctrl / Cmd + Zを使用します。必要に応じて、他の形状のプレハブを作成し、プレハブエディターでさらに改良することができます。
ステップを完了としてマークします
0ProBuilderは、プリミティブオブジェクトを変更および改良するための広範なツールスイートを提供します。練習すれば、Unityのプリミティブから複雑なジオメトリをモデル化できます。次のレッスンでは、これらのオブジェクトに基本的なマテリアルを適用する方法を学習します。
ステップを完了としてマークします事業:ユニット2-リアルタイムの事前視覚化レッスン2.3-セットへのProBuilderシェイプの追加すべて完了をマークして続行します完了をマークせずに続行Copyright©2020Unity Technologies法的個人情報保護方針クッキークッキーの設定言語:英語英語簡略化された中国語韓国語日本語ロシアスペイン語フランス語ドイツ語ポルトガル語

レッスン2.3-セットへのProBuilderシェイプの追加コメントガイドライン一般的なチュートリアルディスカッション001.レッスンの概要002.Probuilderのインストール033.スロープの作成004.ベベルの作成005.新しい形状の作成016.より複雑な形状の構築007.ProBuilderシェイプからプレハブオブジェクトを作成する038.要約00
0プリミティブがProBuilder化されたので、興味深い方法でそれらを変更できます。Probuilderをインストールすると、シーンビューの上部に新しいツールメニューが表示されることに注意してください。ツールメニューには、Probuilderのさまざまなオブジェクト編集モードが表示されます(図07 )。
Probuilderには4つの編集モードがあります。オブジェクト:前の手順でプリミティブを操作したのと同じように、オブジェクト全体を操作します頂点:オブジェクトの頂点を押したり引いたりしますエッジ:オブジェクトのエッジのみを選択して移動します面:オブジェクトの面のみを選択して移動します まず、SmallForegroundBldキューブの1つのエッジを変更して、傾斜した屋根を作成します。 1. SmallForegroundBldキューブの1つを見つけて選択します(図08 )。

ProBuilderのエッジ編集モードを選択します(図09 )。

3.エッジ編集モード(左から3番目)で、キューブの前面の上端を選択します。黄色が強調表示されます(図10 )。

4.と移動選択されたツールは、緑色の「Y」黄色エッジ下方に(変換するには、矢印を使用図11 )。

完了したら、別のオブジェクトをクリックしてエッジを編集するかどうかを指定できます。まだエッジ編集モードになっていることを忘れないでください。オブジェクト編集モードに戻るまで、エッジを選択することしかできません。
ステップを完了としてマークします
0一連のベベルを使用して、丸みを帯びたコーナーを作成できます。ベベルは単にエッジを斜めにカットします。複数のベベルを連続して作成すると、より丸みを帯びた表面を作成できます(図12 )。

1. MediumForegroundBld2キューブの1つを見つけて選択します(図13 )。

2.ここでも、エッジ編集モードで、建物の垂直コーナーエッジを選択します。黄色が強調表示されます(図14 )。

3. Alt +左-ベベルツールをクリックして、その設定にアクセスします。距離を0.1に設定します(図15 )。

4.ベベルツールをもう一度(Altなしで)直接クリックすると、キューブのエッジが0.1でベベルになります(図16 )。

ベベルが新しい面を作成し、新しいエッジが黄色で強調表示されていることに注目してください。 5.新しいベベルの左端の垂直エッジを選択します(図17 )。

6.ここで、ベベルツールをもう一度クリックすると、キューブのエッジが0.1でベベルになります(図18 )。

7.新しいベベルの右端の垂直エッジを選択します(図19 )。

8.ベベルツールをもう一度クリックします。立方体のエッジは0.1で面取りされます(図20 )。

9.必要に応じてベベルのエッジを選択し、移動ツールを使用してそれらの位置を慎重に調整します。オブジェクトのサイズに基づいて、ベベルエッジをわずかに調整する必要がある場合があります。おめでとう!これで、エッジを傾斜させて面取りすることができます。他の前景の建物で新しいスキルを試してみてください(図21 )。

ステップを完了としてマークします
1キューブは私たちを遠くまで連れて行きますが、他の基本的な形ですばやくブロックしたい場合があります。ProBuilderの新しいシェイプツールはそれを支援します(図22 )。

New Shapeツールには、プリズム、階段、円柱、ドア、パイプ、円錐、アーチ、球などのさまざまなオプションがあります。このツールを使用して、シーンにドアと階段を追加します。1. Alt +左クリックして、新しい形状ツールを設定にアクセスします。ドロップダウンメニューで、[ドア]を選択します。シーンにドアが表示されます。エッジモードではなくオブジェクトモードになっていることを確認し、ドアを通りの高さで建物に接するように配置します。[新しい形状の設定]ウィンドウの下部にある[ビルド]を押して、オブジェクトを完成させてください。白から灰色に変わります(図23 )。

2. Alt + [新しい形状]ツールを左クリックして、設定にアクセスします。ドロップダウンメニューで、[階段]を選択します。階段のセットがシーンに表示されます。設定メニューで階段を調整できます。シーンのどこかに階段を配置します。[新しい形状の設定]ウィンドウの下部にある[ビルド]を押して、オブジェクトを完成させてください。白から灰色に変わります(図24 )。。

ステップを完了としてマークします
0プリミティブを変更し、新しいProbuilderオブジェクトを追加する方法を学びました。次に、押し出し面ツールを使用して、新しいオブジェクトでもう少しモデリングを試してみましょう(図25 )。

このツールは、面選択編集モードになるまでアイコンモードツールメニューに表示されません。 3Dオブジェクトのモデリングが初めての場合は、ここで紹介されている多くの新しい概念があるため、次のいくつかの手順に厳密に従ってください。これらのステップでは、ラフスペースニードルをモデル化します(図26 )。

モデリングの経験がある場合は、手順1〜14をスキップし、[面の押し出し]ツールと[移動]および[スケール]ツールを使用して、このようなモデルを作成できます(図27 )。

始めましょう。 1.面の押し出しツールを使用する前に、新しい形状ツールを使用して新しい立方体を作成する必要があります。新しいキューブをX:5、Y:5、Z:5にスケーリングし、ビルドします(図28 )。

2.キューブを地面に移動し、他のオブジェクトから離して、作業しやすくします。3. ProBuilderの面選択編集モードで、立方体の上面を選択します(図29 )。

次に、[面を押し出し]ツールを使用してこのオブジェクトの面を押し出します。これを行うには、[面を押し出し]ボタンを押すか、ショートカットホットキーのCtrl / Cmd + Eを使用します。次の手順では、ショートカットを使用します。また、[押し出し面]設定をデフォルトに設定したままにしておきます(図30 )。

4. Ctrl / Cmd + Eを押します。顔はそのように押し出されます(図31 )。

5.移動ツールを使用して、立方体をシーンの高層と同じ高さにします(図32 )。

6.スケールツールを使用して、ツールの中央にある白いボックスを使用して、立方体の面を内側に均一にスケールします(図33 )。

7. Ctrl / Cmd + Eを押します。顔はそのように押し出されます(図34 )。

8.スケールツールを使用して、面を外側に均一にスケールします(図35 )。

9. Ctrl / Cmd + Eを押します。顔はそのように押し出されます(図36 )。

10.移動ツールを使用して、新しいプラットフォームの高さを伸ばします(図37 )。

11. Ctrl / Cmd + Eを押します。顔はそのように押し出されます(図38 )。

12.スケールツールを使用して、面を内側に約90%均一にスケールします。(図39 )

13. Ctrl / Cmd + Eを押します。顔はそのように押し出されます(図40 )。

14.スケールツールを使用して、面を内側に95%均一にスケールします。移動ツールを使用して面を上に伸ばし、建物の上部にポイントを作成します(図41 )。

おめでとう!大まかにではありますが、スペースニードルをモデル化しましたが、少しの練習と忍耐で、より洗練されたオブジェクトを作成するために必要な基本的なスキルを習得しました。 15.シェイプが完成したら、インスペクターでSpaceNeedleという名前を付けます。16.形状を複製し、スケッチを基準にして両方をシーンに配置します(図42 )。

スカイラインは次のようになります(図43 )。

ステップを完了としてマークします
3プレハブは、再構成することなく、シーン間、または他のプロジェクト間で共有および参照できるユニークなタイプのゲームオブジェクトです。プレハブの主な利点は、元のプレハブに加えられた、または適用された変更が他のすべてのインスタンスに拡張されることです。これにより、エラーの修正と変更の作成が迅速かつ効率的になります。プレハブは、オブジェクトが階層からプロジェクトウィンドウにドラッグされると自動的に作成されます。 作成したSpaceNeedleオブジェクトのプレハブを作成しましょう。1.まず、都市の左側にあるSpaceNeedleシェイプを選択します。2.次に、プロジェクトウィンドウのPrefabsフォルダーにドラッグアンドドロップします。3.都市の右側にあるSpaceNeedleシェイプを削除し、SpaceNeedleプレハブをプロジェクトウィンドウからシーンビューにドラッグして作成したプレハブに置き換えます。プレハブは、プロジェクトウィンドウで* .prefabファイル拡張子を介して区別され、階層内で青いフォントでラベル付けされます(図44 )。

プロジェクトウィンドウでプレハブをダブルクリックすると、プレハブエディタを開くことができます。ここでは、作成したばかりのプレハブを分離ビューで確認し、個々のコンポーネントを編集することもできます(図45 )。

ProBuilderの編集モードに入り、このプレハブに追加の変更を加えることができます。変更は、シーン内のプレハブのすべてのインスタンスに反映されます。これを示すために、SpaceNeedleオブジェクトを少し調整してみましょう。
5.階層の下にあるSpaceNeedleの戻るボタンを押して、シーンビューに戻ります(図46 )。

ここで、シーンビューに戻ると、変更がSpaceNeedleプレハブの両方のインスタンスに適用されていることがわかります(図47 )。

スペースニードルの背の高いバージョンに戻したい場合は、Ctrl / Cmd + Zを使用します。必要に応じて、他の形状のプレハブを作成し、プレハブエディターでさらに改良することができます。
ステップを完了としてマークします
0ProBuilderは、プリミティブオブジェクトを変更および改良するための広範なツールスイートを提供します。練習すれば、Unityのプリミティブから複雑なジオメトリをモデル化できます。次のレッスンでは、これらのオブジェクトに基本的なマテリアルを適用する方法を学習します。
You need to login in order to like this post: click here
YOU MIGHT ALSO LIKE

SUBSCRIBE TO OUR NEWSLETTER